Setting Up Kubernetes in Hyper-V – Manual Method
This blog will show how one can set up a Kubernetes cluster on a Windows workstation – no cloud providers needed. Keep in mind, that the cluster we are provisioning in this tutorial is for testing and learning purposes only.
One can work through this tutorial to become more familiar with the fundamentals of manually deploying a vanilla k8s cluster into Hyper-V. Or, if you’re like me and want to run a K8s cluster on your seriously underutilized gaming computer this tutorial may be of interest to you too.
This guide is broken down into three sections, host, virtual machines, and kubernetes. By the end, you will have a k8s cluster with a master node and two worker nodes.
Requirements:
- Windows 10 Pro or Windows Server
- Hyper-V enabled
- CentOS7
Host –
Operating System: Windows 10 Pro 21H2
RAM: 32 GB
CPU: i7-10700K
Hypervisor: Hyper-V
Network Settings:
Management Network:
192.168.1.0 /24
DNS: 1.1.1.1, 8.8.8.8
Host File Config:
192.168.0.2 master
192.168.0.3 worker-01
192.168.0.4 worker-02
Hyper V Virtual Switch Config:
Create virtual switch “NATSwitch”.
New-VMSwitch -SwitchName "NATSwitch" -SwitchType InternalAssign chosen IP range to the virtual switch.
New-NetIPAddress -IPAddress 192.168.0.1 -PrefixLength 24 -InterfaceAlias "vEthernet (NATSwitch)"Create a NAT network.
New-NetNat -Name "NATNetwork" -InternalIPInterfaceAddressPrefix 192.168.0.0/24You will have a new Hyper-V switch called NATSwitch. This will enable us to connect to our virtual machines and the Kubernetes cluster from our host machine.

Troubleshooting
Multiple NAT networks are not supported.
This guide assumes that there are no other NATs on the host. However, applications or services will require the use of a NAT and may create one as part of the setup. Since Windows (WinNAT) only supports one internal NAT subnet prefix, trying to create multiple NATs will place the system into an unknown state.
VMs –
master (k8s master node)-
Host Name: master
Operating System: CentOS7.2009
Dynamic Memory (in MB): Assigned: 16000
Min: 8192 Max: 1048576
CPU: 4 cores
IP address: 192.168.0.2/24
DNS: 1.1.1.1, 8.8.8.8
worker-01 (k8s worker node)-
Host Name: worker-01
Operating System: CentOS7.2009
Dynamic Memory (in MB): Assigned: 6000 Min: 512 Max: 8192
CPU: 4 cores
IP address: 192.168.0.3/24
DNS: 1.1.1.1, 8.8.8.8
worker-02 (k8s worker node)-
Host Name: worker-02
Operating System: CentOS7.2009
Dynamic Memory (in MB): Assigned: 6000 Min: 512 Max: 8192
CPU: 4 cores
IP address: 192.168.0.4/24
DNS: 1.1.1.1, 8.8.8.8
OS Configuration (Required on all VMs):
Host File Config:
sudo vi /etc/hosts192.168.0.2 master
192.168.0.3 worker-01
192.168.0.4 worker-02Disable firewalld Permanently.
sudo systemctl stop firewalldsudo systemctl disable firewalldsudo systemctl disable firewalldsudo systemctl mask --now firewalld
Update IPtables Settings.
cat <<EOF > /etc/sysctl.d/k8s.conf
net.bridge.bridge-nf-call-ip6tables = 1
net.bridge.bridge-nf-call-iptables = 1
EOF
sysctl --system
Disable SELinux
sudo setenforce 0sudo sed -i ‘s/^SELINUX=enforcing$/SELINUX=permissive/’ /etc/selinux/configDisable SWAP.
sudo sed -i '/swap/d' /etc/fstabsudo swapoff -aDocker:
Update Docker Package Database
sudo yum check-updateInstall the Dependencies
sudo yum install -y yum-utils device-mapper-persistent-data lvm2Add the Docker Repository to CentOS
sudo yum-config-manager --add-repo https://download.docker.com/linux/centos/docker-ce.repo
Install Docker On CentOS Using Yum
sudo yum install dockerManage Docker Service
sudo systemctl start dockersudo systemctl enable dockersudo systemctl status dockerKubernetes:
Configure Kubernetes Repository
cat <<EOF > /etc/yum.repos.d/kubernetes.repo[kubernetes]name=Kubernetesbaseurl=https://packages.cloud.google.com/yum/repos/kubernetes-el7-x86_6enabled=1gpgcheck=1repo_gpgcheck=1gpgkey=https://packages.cloud.google.com/yum/doc/yum-key.gpg https://packages.cloud.google.com/yum/doc/rpm-package-key.gpgEOFInstall kubelet, kubeadm, and kubectl
sudo yum install -y kubelet kubeadm kubectlsystemctl enable kubeletsystemctl start kubeletCreate Cluster with kubeadm
sudo kubeadm initManage Cluster as Regular User
mkdir -p $HOME/.kubesudo cp -i /etc/kubernetes/admin.conf $HOME/.kube/configsudo chown $(id -u):$(id -g) $HOME/.kube/configSet Up Pod Network – Install Calico Using Helm
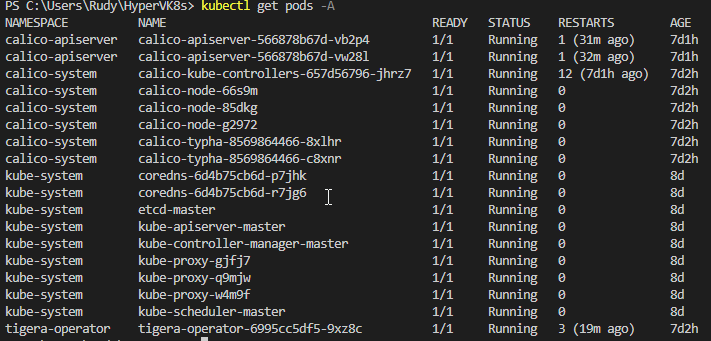
helm repo add projectcalico https://projectcalico.docs.tigera.io/chartskubectl create namespace tigera-operatorhelm install calico projectcalico/tigera-operator --version v3.23.3 --namespace tigera-operatorCheck your currently running pods, they should look like mine below
Take a checkpoint of master, worker-01, and worker-02 with Hyper-V. This is a good stopping point.
My plans for this project are to create a network and infrastructure diagram of the cluster, allow external traffic into the cluster using metallb and nginx, integrate CI/CD for securing, deploying, and configuring resources into the cluster, and deploy the Prometheus-Grafana stack.
I really need some kind of checklist or kanban for this…Nah that would be too much like work and this is supposed to be fun!
Thanks for reading this far.
-Rudy
References:
https://docs.microsoft.com/en-us/virtualization/hyper-v-on-windows/user-guide/setup-nat-network
https://docs.microsoft.com/en-us/virtualization/hyper-v-on-windows/user-guide/setup-nat-network#multiple-applications-using-the-same-nat
https://docs.microsoft.com/en-us/virtualization/hyper-v-on-windows/quick-start/enable-hyper-v
https://kubernetes.io/docs/setup/production-environment/tools/kubeadm/install-kubeadm/
https://projectcalico.docs.tigera.io/getting-started/kubernetes/helm
https://docs.docker.com/engine/install/centos/