
Deploying A Kusama Validator Into Azure Using Terraform and Bash
Introduction
Kusama is a decentralized computer network. It was founded in 2019 by the creators of Polkadot, Gavin Wood (a co-founder of Ethereum), Peter Czaban, and Robert Habermeier. Kusama uses the same codebase and binary file as Polkadot.
As such, a big focus of Kusama is to provide a test platform for Polkadot software developers and stakeholders to deploy and thoroughly test decentralized solutions running on Substrate before releasing them into the Polkadot ecosystem.
To understand the Polkadot ecosystem is to understand Kusama. Learning all of the aspects involved in the infrastructure, software, and jargon involved is out of the scope of this blog.
Please see Polkadot’s documentation to learn more.

The purpose of this blog is to document how one can deploy a Kusama validator node into Azure using Terraform to automate the creation and configuration of the platform layer and bash scripting to automate the configuration of the software layer.
This solution was designed with stability, security, cost-effectiveness, visibility, and ease of deployment as primary goals. It is not perfect and has plenty of room for improvement. I encourage all who read this to reach out to me in the comments or contact me directly with feedback.
Prerequisites
You can get a free $200 credit from Microsoft to start this project.
The Azure CLI is a command line interface tool created by Microsoft to provision and administer resources in Azure.
A popular choice for deploying and managing resources in Azure, Terraform uses the Hashicorp Configuration Language (HCL) combined with the binary terraform.exe to perform its magic. We will be using Terraform to deploy and manage the infrastructure in this project.
We will use VSCode as our source code editor and our ssh client.
Platform Layer
- Download and setup Terraform locally.
- Create a Microsoft Azure Tenant and then create a Subscription.
- Open Visual Studio Code, open terminal, and clone the ksm-azure repository.
git clone https://github.com/RCFromCLE/ksm-azure.git - Change directory into ./terraform and open the terraform.tfvars file.

- Edit variable sub_id from terraform.tfvars file to equal the Azure Subscription ID you created above.

- Edit variable ssh_allowed_ip_range to equal the public IP from where you will be SSHing into the validator. In my case, my home network’s public IP – 71.31.64.0/18″.

- Generate an SSH keypair called id_rsa and store it in your users/$username/.ssh directory. Be sure to backup and not lose your private key. This will be the only key from which you can connect to your virtual machine, val-ubu-01 as password authentication will be disabled.
ssh-keygen -t rsa -b 4096 - Run tf init and initialize ksm-azure/terraform as Terraform directory.
terraform init - Run tf plan and confirm you see all of the resources to be added.
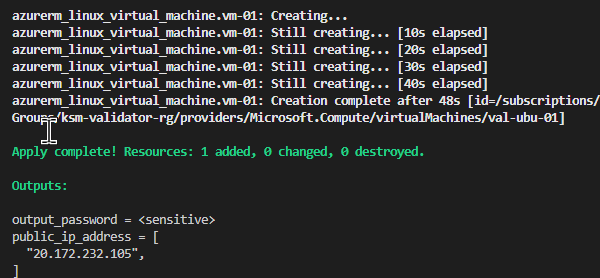
tf plan - Run tf apply to deploy the resources into Azure. If you get a 404 error “resource group not found” on the initial tf apply, run another tf apply. This one will complete just fine and your validator and associated resources should now be provisioned!
terraform apply
Application Layer
Now that you have set up the platform layer you are ready to install and configure the Polkadot binary to run as a service on your new virtual machine.
- Install the SSH extension in VSCode then connect to the VM (val-ubu-01) you just created. Use the public_ip_address output to connect. Once connected you can use the terminal within VSCode to continue. administering your validator.
- Run sudo -i to enter persistent admin context.
sudo -i - Run the following command to install and configure the Polkadot binary and its dependencies to run as a service. All thanks to STAKEWORLD for creating this script and helping me get my own validator up and running in the Kusama validator lounge.
curl -o- -L https://raw.githubusercontent.com/stakeworld/stakeworld-scripts/master/node-install.sh | bash - Confirm the install completed successfully by reviewing the service log’s output and its unit file’s configuration information. Should you need to make any changes to the service file you can find it at /etc/systemd/system/MisfitsStaking-01.service.
journalctl -xefu MisfitsStaking-01.servicesudo systemctl status MisfitsStaking-01.service - Browse Polkadot’s telemetry site and find your node. You can just start typing your validator’s node name and it will begin searching.
- Back on your VM export your session key using the below command.
curl -H "Content-Type: application/json" -d '{"id":1, "jsonrpc":"2.0", "method": "author_rotateKeys", "params":[]}' http://localhost:9901 - Now that you have your session keys you need to import them into the Kusama/Polkadot portal. Paradox on Youtube has created an awesome video to walk you through this process.
That’s all for now. In the future, I plan to post about how to monitor your validator. Expanding the terraform code to deploy more than one node. A cost analysis of this solution. And should this solution be economically viable, I will look into making it more highly available and adding a disaster recovery aspect to it.
Thanks so much for reading this far!
-Rudy
Helpful Links
–https://github.com/RCFromCLE/ksm-azure
-https://github.com/stakeworld/stakeworld-scripts
-https://riot.im/app/#/room/#KusamaValidatorLounge:polkadot.builders